Expert Tips

Turn Your Foyer Into a Winter Wonderland  

Decorating during the holiday season is the best way to beat the chilly weather and add some colour and warmth into your home. And since your foyer is what greets you and your guests first, it’s worth some time and efforts in making it look magical and inviting. Here are some ways to turn your foyer into a winter wonderland so you can be greeted by the warmth of the holiday season each and every time.

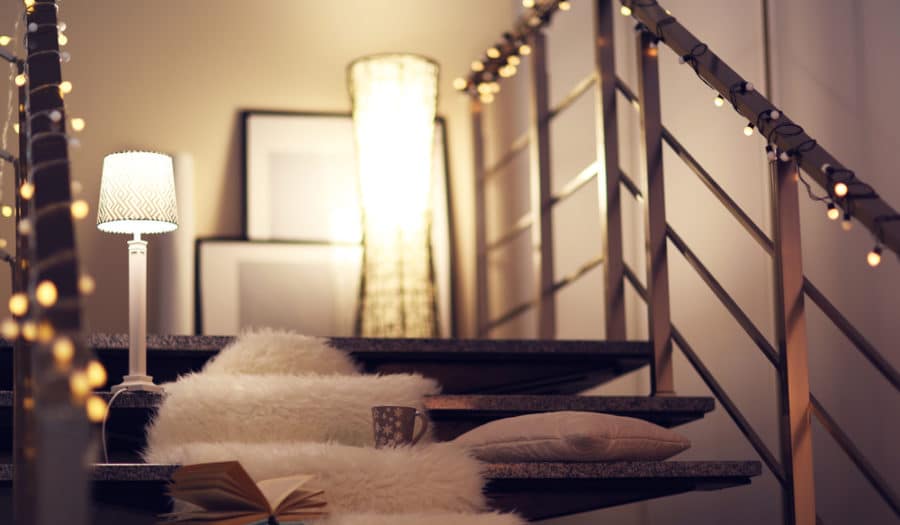
Add Fresh Garland On The Railings

Garland is always a holiday classic and it’s one of the best elements to add into your foyer so that you and your guests can enjoy being greeted with the fresh, outdoor pine scent when you walk inside. You can also intertwine some lights along the garland to make it really set the tone of the holidays.

Stick To Neutral Tones

Turning your foyer into a winter wonderland is easy to do with a display of neutral tones and white, mixed with the magical touch of sparling lights and ornaments. This combination essentially mimics the glistening snow that makes winter such a beautiful and magical time of the year. So consider ways to pair off-whites, beige, and that snowy winter palette through ornaments, candles, cushions and more.

Create A Centerpiece

If you have a table in your foyer, why not create a centerpiece for it? This can be a combination of floral arrangements, such as a mixture of greenery, birch branches, bows, boughs and more. Alternatively, you can create a cake plate of Christmas bulbs stacked up to form a triangular concept of a tree. Whether you prefer classic and traditional or modern and sleek, get creative with your foyer table centerpiece to add height and a focal point to your display.

Add Touches Of Festive Bronze

Bronze is another stunning element that really adds shimmer and light that can instantly turn your foyer into a winter wonderland. You can add shimmering bronze bows to your front door wreath, combine it with touches of that rich forest green, or sprinkle some dashes of it throughout your urns and table centerpiece to draw in the eye of your guests as they enter your home.

Nothing says winter wonderland like the combination of neutral tones and shimmering dashes of light. So if your foyer is looking bland and boring, create some winter magic by adding some of these simple décor features into your home this season.  Contact us, or give us a call at (613)727-9427

4 Decor Ideas for Your Backyard Coach House

Need some ideas for your backyard coach house? Modern coach house designs have come a long way since housing horse and carriages back in the day. Today, they’re often converted into quaint and characterful domestic dwellings that can be tailored to whatever style or need you prefer. Whether you have aging parents to care for, an older child looking for some independence, or if you simply need some extra quiet space to get work done, here are some décor ideas for you to consider for your backyard coach house.

Home for Aging Parents

When your parents reach a certain age, it’s nice to be able to have them close to home so that you can look after them and help take care of them when needed. A backyard coach house offers the perfect space for them to live, being close to home without invading your space while allowing them to maintain their independence as well.

When designing for this purpose, consider features such as wide doorways or easy, accessible ramps. Also, enhanced safety features like a walk-in shower with handrails and lots of great lighting along the exterior and interior are important.

Backyard Coach House

Apartment for Your Eldest Child

If you have a college-age child that’s eager for some independence, why not convert your backyard coach house into a loft where they can test out their wings before they really spread them? Make it modern and fresh with a great entertainment system, surround sound, and of course, a workspace where they can get all their assignments done.

Home Office Space

If you have a work-from-home career, you can create the perfect work zone that’s away from the distractions so you can get down to business. For this, you’ll need lots of built-in storage, large expansive windows to give you plenty of natural light, and product-inspiring colours for the walls like blue, yellow, or orange.

Rental Unit

If you’re eager to make some additional income, you can create a cozy rental property with rustic wooden floors, fresh, bright kitchen cabinetry, and even a few sunroofs to brighten it up if you find that you coach house is overshadowed and dark during the daytime.

Having a backyard coach house is a great additional space that can come in handy when you need it the most. So if you’ve been neglecting yours, let these ideas get you inspired to create an additional space the serves your needs well.

At RenosGroup.ca, we can help make your vision a reality. With our knowledge and expertise, you can trust us to take care of any home reno projectContact us, or give us a call at (613)727-9427

How to Prevent Mold & Mildew Growth Following a Bathroom Renovation

Bathrooms are a common place for mold and mildew to thrive in. With all of the constant moisture and hot steam being produced from the shower, it can begin to grow along the ceiling, walls or shower area, causing potential harm to the structure of the bathroom and to your health.  That’s why it’s necessary to take some preventative measures after you’ve renovated to avoid dealing with any harmful spores. Follow these tips on how to prevent mold and mildew growth, following a bathroom renovation.

Good Ventilation is a Must

Since the bathroom is the dampest room in your home, it’s where mold and mildew are most likely to develop, which can end up damaging your grout, wood and other items. It can also lead to allergies and respiratory problems. So one of the most important things to include in your bathroom renovation is a good ventilation system that can remove the moisture and steam fast. You should also encourage your family members to crack open a window after each shower.

How to Prevent Mold & Mildew Growth Following a Bathroom Renovation

Avoid Using Textiles

Although most bathroom designs don’t include textiles like carpeting, you may want to avoid using them also for the shower curtain, wallpaper and anything similar that mold spores can latch onto and grow on. With the moisture and heat, certain fabrics and materials are not suitable to include in the décor, so make sure you’re careful about what you place in there.

Don’t Cheap Out of the Fixtures

When it comes to the fixtures and plumbing, it can be easy to go with the cheapest options. But keep in mind that sometimes spending a little more now can save you from spending a lot more later. Upgrading your plumbing and fixtures can help you steer clear of dealing with cracks and leaks, which will add more moisture and potential mold growth into your bathroom.

Use Mold & Mildew-Resistant Materials

Being preventative is always a smart move to avoid costly and hazardous situations in the future. You can use materials that are resistant to mold and mildew, such as paint, flooring and other specific treatments that can be applied to surfaces.

If you’ve just realized how susceptible your bathroom is to these spores, you can prevent mold and mildew growth after a bathroom renovation by implementing some of these important steps. Or you can contact us, or call at (613)727-9427 to take care of your reno for you so that you don’t have to worry!

Hottest Colour Trends

If you’re tired of staring at the same old colour on the walls in your home, adding in some fresh, modern hues and shades can help spruce it up.  It’s so convenient when you get to switch up your design and décor, even just a tad, to rejuvenate the look of any room. And this year, designers are falling for some serious shades and strong, bold, exotic hues that are 2017’s hottest colour trends so far.

To give you a palette of inspiration when you’re ready to freshen up your home, read on to find out what colours are dominating the interior design world.


Moody Shades And Wallpaper Designs


The bedroom is where we like to cozy up and feel relaxed. And this year, we’re seeing a trend of shades and even wallpaper designs that embody moodier tones, combined with dark wood stains and splashes of colour to set the tone just right. Combinations of navy blue, dark plum, and grays are perfect for getting that cozy, comfortable atmosphere.


“Millennial Pink”


Millennial pink, also known as Windsor pink, is another dominant favourite this year. This combination of peach-salmon offers the perfect blend of colour that in essence, acts as a neutral tone. With both youthful and elegant properties, it can go just about anywhere and for any age group, despite the “Millennial” label.


Autumn Maple


This October, get in on the colour that perfectly embodies everything we love about the fall time. This burnt orange is fresh, spicy, exotic and goes perfectly with darker toned wood and lighter blonde accents.


Black Chiffon


In a similar vein with the moodier tones, Black Chiffon, which looks like a black charcoal mix, is dominating feature walls with many black on black tone layering happening. Dark leather chairs, all black built-in wall units, slate table tops, black vases and flickers of gold accents create a sexy, masculine design that make it impressive for any statement wall.


Deep Emerald


There’s something undeniably mystical about the bluegrass green that’s wrapped up in deep Emerald. It’s an historical colour that embodies sophistication, elegance and that perfect traditional country home vibe that is sure to reignite your love for any room in your home.

The colour palette is proving to be an exciting one among the hottest trends. So why not give your home décor a facelift by getting creative with colour and finding ways to splash in some of these moody and exotic hues into your space this year.  Contact us, or give us a call at (613)727-9427

5 Downsides of a DIY Remodel

Thinking of taking on a DIY remodel? Well, you might want to think again before jumping into that. As great as those Youtube videos may seem, the reality is that DIY projects can be much more of a hassle and simply not worth the amount of time and aggravation it can end up requiring. When it comes to home projects like a bathroom upgrade or remodelling the interior, it’s always best to leave it to the professionals.

Following DIY instructions to take on something that you may not be equipped for – such as plumbing, demolishing, or rebuilding – can be dangerous and can end up costing you much more in the long run if something goes wrong.

So if you’re teetering on that DIY debate, consider the 5 downsides of a DIY remodel first.

Calculating The Real Cost

With the amount of DIY videos that are fluttering around online, it’s hard not to get caught up in that DIY fever. And one of the main motivating reasons why many homeowners take on these home projects is to save some of their hard earned money. But the reality is that it’s often not as much of a frugal path as they were hoping for.

There are many projects that can cost much more in reality, and the fact is that many experienced, reputable contractors have connections to suppliers that offer discounts to keep costs lower. Plus, when you begin to factor in the amount of time you’ll have to spend in between your full-time job, the question should always be, is it really, really worth it?

Take the time to analyze these factors and determine if the time, effort, and supplies really outweigh the benefits of hiring a professional contractor who can get the job done for you.

Downsides of a DIY Remodel

Safety First

Safety should always be an important priority to consider. Do you have the necessary skills to take on this DIY remodel project? Can you safely take care of the plumbing or electrical wiring for those necessary features? It’s important to recognize when something is out of your repertoire of skills and when certain tasks should only be dealt with by a trained and license professional.

Can You Handle The Mess?

Professional, experienced contractors not only have the skills to take on necessary projects safely, but they also know how to manoeuvre themselves, labourers, and supplies in such a way that won’t leave a massive mess for you to deal with. Containing any mess is often a part of the job. So if you can’t handle the idea of living with a mess to deal with after struggling through your DIY, then it’s worth your time to opt out of taking it upon yourself to do.

Staying Within Your Budget

Staying within your budget can also become extremely challenging when you’re unsure of where and what the best strategy is for obtaining the necessary supplies. A contractor can recommend materials and supplies that can achieve your vision, while maintaining your set budget.

Finding The Time

Ask yourself if you really have the time to spare? Remember, any project usually takes more time than initially thought – especially when you take it upon yourself to do. If you barely have the time to spare for yourself, then finding time for your DIY remodel can lead to a lot of stress and aggravation.

As tempting as a DIY project may seem, in the end, many homeowners realize that it really isn’t worth the time, aggravation and energy it requires. Save yourself the headache and call the professionals at RenosGroup.  If you want to learn more about the downsides of a DIY remodel don’t hesitate to contact us, or give us a call at (613)727-9427

Planning an Eco-Friendly Kitchen Renovation

Wondering how you can make your kitchen more eco-friendly? Well, there are plenty of ways – from big changes and additions to simple ones like using non-toxic paint on the walls, minimizing wasteful products, and encourage recycling and composting. But those are just the tip of the iceberg. For more ideas when planning out an eco-friendly kitchen renovation, read on.

Install Natural Flooring

Starting from the ground up, consider the type of flooring that will be installed. There are plenty of natural options like hard wood, or linoleum that don’t contain the toxins that are found in many other manufactured materials. But one option that is gaining popularity is cork.

This is a very sustainable material and is of course, non-toxic. It’s a better eco-friendly option in comparison to other natural woods such as oak since cork trees regenerate every nine years as oppose to oak trees (among others) that can take over 30 years. That’s a big difference!

So when considering what floor to place down, give some serious thought to cork, which is available at roughly the same price as other wood flooring.

Upgrade to Energy Efficient Appliances

Between the amount of appliances that get used in the kitchen, this is where a great deal of energy can be wasted, which adds more stress to our environment. If you’re considering an upgrade, make sure to look for that Energy Star label that will tell you it’s energy efficient. And if your budget can’t stretch as far to replace all of your appliances, then just consider some of the ones that are major energy hogs like the fridge, oven and dishwasher. These three are generally the most wasteful and expensive, so by upgrading you can save money too.

Use a Water-Saving Faucet

Wasting water is something we are all guilty of. But there are ways to help combat our bad habits. For example, installing a water-saving faucet is a really helpful addition to any eco-friendly kitchen plan. With a flow rate around 2.2 gallons per minute, it helps you conserve water without even thinking about it.

Refinish & Refurbish Rather Than Replace

Think your cupboards look dated? Well instead of ripping them down and adding that to a landfill, consider saving time and money by giving them a facelift. As more homeowners are looking for ways to cut down on costs, refurbishing older items to look better than new, is more popular than ever. Give them a good sanding and get creative with your (non-toxic) paint.

When you’re ready to get on board with an eco-friendly kitchen renovation, take note of these key areas that can transform your kitchen into something beautiful for both you and the environment.  Contact us, or give us a call at (613)727-9427

Mobility Renovations: Do You Have a Safe Entryway?

Worried about falls in your entryway? Read these mobility renovations: do you have a safe entryway?

Having an entryway that enables you to exit and enter the home quickly is not only important for safety reasons, but it’s also an important matter to address for the sake of efficiency, independence and dignity for those living with mobility limitations. Thankfully, there are many alterations – from big ones to minor ones – that can make your entranceway a breeze to get through for anyone using mobility devices such as a wheelchair or walker.

If you’re wondering whether you have a safe entryway, here are some factors to consider to help assess it and to give you ideas on how it could be improved for efficiency and safety.

Have a Clear Pathway

Before installing any additions to assist in entering and exiting, you should first take a look at the walkway leading up to your entryway. This should be cleared from any obstacles, such as overgrown hedges and garden debris. If there is any patio stones that are weathered and buckling or loose, these should be addressed and replaced first.

Before stepping up your home’s accessibility, ensure a smooth and safe pathway to your entryway. Here’s how:

1. Clear the Path:

  • Remove obstacles: Eliminate overgrown hedges, branches, garden debris, or anything that could obstruct the walkway.
  • Address uneven surfaces: Repair or replace cracked, buckling, or loose patio stones that pose tripping hazards.
  • Trim back vegetation: Ensure plants and shrubs don’t encroach on the pathway, especially near steps or railings.

2. Enhance Visibility:

  • Install proper lighting: Brighten the walkway with motion-sensor lights or solar-powered options for improved visibility, especially at night and during bad weather.
  • Clear snow and ice promptly: Keep the pathway free of wintery hazards to prevent slips and falls.

3. Consider Additional Safety Measures:

  • Handrails: Install sturdy handrails on both sides of steps or along inclined walkways for added support and balance.
  • Non-slip surfaces: Opt for textured or non-slip surfaces on walkways and steps to minimize the risk of slipping, especially in wet or icy conditions.
  • Contrasting colors: Use contrasting colors for steps and edges to improve visibility, particularly for those with visual impairments.

Mobility Renovations: Do You Have a Safe Entryway?

Light It Up

Having proper lighting is also crucial to avoid injury and make it easy to get to and from your home. Light features should be installed to illuminate any walkway or paths that provide access to your home. You can install a motion light that will kick on once someone approaches the entryway to ensure the door handle and lock is clearly visible at all times.

Having a clear pathway is crucial for safe and easy access to your home, but don’t underestimate the power of proper lighting. Here’s how to “light it up” for both practical and aesthetic purposes:

Safety First:

  • Brighten the entrance: Use motion-sensor or automatic lights to illuminate the walkway and entryway, especially at night. Consider solar-powered options for an eco-friendly solution.
  • Step it up: Illuminate steps with well-placed lights to prevent tripping hazards. This is especially important for uneven or winding pathways.
  • Clear sightlines: Avoid light spillage onto neighboring properties or creating glare towards oncoming pedestrians.

Beyond Safety:

  • Create ambiance: Use warm-toned lights to create a welcoming and inviting atmosphere at your entryway. String lights, lanterns, or recessed lighting can add charm and character.
  • Highlight features: Showcase landscaping elements, sculptures, or architectural details with focused spotlights or uplighting.
  • Set the mood: Consider using smart lighting that allows you to adjust brightness and color temperature to create different moods and ambiences for various occasions.

Additional Tips:

  • Follow local regulations: Make sure your lighting installation complies with local ordinances regarding light pollution and nighttime illumination.
  • Think long-term: Choose durable and weatherproof fixtures that can withstand the elements.
  • Professional touch: For complex installations or extensive lighting systems, consider consulting a professional electrician or landscape lighting designer.

By prioritizing safety and incorporating creative elements, you can transform your pathway into a well-lit, welcoming, and aesthetically pleasing extension of your home.

Low Riser, Long-Tread Steps

If you or a family member relies on a walker or crutch, then drastic improvements like installing a ramp might not be necessary. Instead, having low rising steps with long treads can help. These steps provide enough room to accommodate the size of a walker or similar equipment and don’t require taking such a big step up or down. This is a good option when a ramp is impractical but your current steps are too steep and cumbersome.

Traditional steps can be daunting for individuals with mobility challenges, but fear not! There’s a game-changer in the game: Low-riser, long-tread steps. Here’s the lowdown on these accessibility heroes:

What are they?

Imagine your usual stairs, but with wider treads and shorter risers, creating a gentle incline rather than a steep climb. This design offers:

  • Reduced effort: Smaller riser heights require less leg lift, making navigation easier for those with limited mobility.
  • Increased stability: Wider treads provide more platform, improving balance and confidence during each step.
  • Reduced fall risk: This combination minimizes the risk of tripping or losing balance compared to standard stairs.

Who benefits?

These steps are ideal for:

  • Individuals with mobility limitations due to age, disability, or injury.
  • People who use walkers, canes, or wheelchairs (with assistance).
  • Families with young children or elderly members for improved accessibility.

Design considerations:

  • Riser height: Typically between 4-6 inches, ensuring comfortable step-over for most users.
  • Tread depth: Generally double the riser height for adequate foot placement.
  • Handrails: Essential on both sides for added support and balance.
  • Landing platforms: Consider incorporating level landings at intervals for a safe resting point.

Bonus features:

  • Non-slip surfaces: Opt for textured or traction-enhancing materials to prevent slips and falls.
  • Contrasting colors: Use contrasting colors for steps and edges to improve visibility, especially for those with visual impairments.
  • Lighting: Ensure proper illumination of the steps for safe use during low-light conditions.

Ramps and Vertical Porch Lifts

If you do require accessibility for a wheelchair, scooter or a similar device then a ramp or vertical porch lift can be necessary. Ramps can be customized to your home and entryway, plus, you can have a “suitcase” ramp installed, which can fold up and be carried by handles. Porch lifts can bypass the hassle altogether by carrying a person on their device to the doorway level.

When accessibility becomes a concern, both ramps and vertical porch lifts offer solutions to navigate entryways with ease. But choosing the right one depends on various factors. Let’s delve into their strengths and considerations:

Ramps:

  • Pros: Affordable, relatively easy to install, offers gradual incline for independent usage by many users.
  • Cons: Requires significant space, may not be feasible for steep inclines, can be weather-sensitive, and aesthetics might not blend seamlessly.

Vertical Porch Lifts:

  • Pros: Compact and space-saving, overcomes steep inclines efficiently, provides effortless ascent for users with limited mobility.
  • Cons: Higher initial cost, requires professional installation, might have potential maintenance needs, and aesthetic integration might require customization.

Making the Choice:

Consider:

  • Available space: Ramps need a gradual incline, while lifts require minimal footprint.
  • Budget: Ramps are generally cheaper upfront, while lifts have higher initial costs.
  • User needs: Evaluate individual mobility level and independence with using each option.
  • Aesthetics: Consider how each solution visually integrates with your home’s style.
  • Maintenance: Factor in potential upkeep needs for each option.

Additional Options:

  • Combined solutions: Consider a combination of a shorter ramp and a lift for specific needs.
  • Platform lifts: Explore enclosed platform lifts for additional weather protection.

In order to determine whether you have a safe entryway, take a few moments to assess the layout and functionality of it. Simple things like lighting or loose patio stones can create potential safety hazards, whereas upgrading steps or installing a ramp could make exiting and entering much easier and safer.

For any mobility renovations, RenosGroup.ca can help. Contact us, or give us a call at (613)727-9427 today to get started with your home projects.

Designing an Office Space That Works

Today, we’re seeing the traditional office concept give way to layouts and designs that reinforce and reflect core values of your business and get the most out of the space you have. But what might work for one space might not for another. So how do you design an office space that works for your business in your home?

Read on to learn more about some key elements to consider.

Available Space

One of the biggest challenges when it comes to office space design is how to get the most out of the space you have. When considering how to utilize the space available, keep in mind privacy, sound, and work flow needs. For instance, creating an open design in any space can be effective when your company works in teams and meetings will take place there.  On the other hand, if you work with clients on the phone or through video conferencing, a closed design room is better where you can get the privacy you need.

Windows and Lighting

This is a very important factor of any design – especially workplace environments. Lighting – both natural and artificial – can have a major impact on the wellness and productivity as many studies have shown. Maximizing natural light as much as possible and illuminating darkened areas with full-spectrum bulbs that simulate daylight can help.

Functional Meeting Rooms

Of course, every office needs an area to facilitate face-to-face meetings. Consider the size of your team in relation to the table, seating and overall room. Also, consider if you want to host clients in this space, training sessions, or even events. Adjustments and alterations should be made if a space is confined and tight.

Flexible Storage Spaces

When space is an issue if you don’t have a good storage layout you can end up working in a chaotic mess. Creative storage can help you get the most out of your office space and keep you organized and looking professional. Try wall storage, display shelves, and vertical storage. If you are using an old bedroom space for your office consider turning the closet into a shelving system to optimize space.

Designing an office space doesn’t have to be challenging, there are so many ways you can achieve an engaging work environment while optimizing on space. When designing an office space that works for your business need, talk to RenosGroup.ca. As a leading home renovation company in Ottawa, we can help you achieve the design you want with the space you have.  Contact us, or give us a call at (613)727-9427 today

Sink or Swim: New Life for Your Kitchen Sink After the Reno

Taking on a kitchen reno and wondering what to do with your old sink? Upgrading and remodelling doesn’t necessarily mean those old fixtures should be tossed away. You can consider placing it online to sell or even donating it to be reused for someone else to enjoy. If there’s still life left in your old sink, here are some options for you to consider for your kitchen sink after the reno.


Repurpose the Sink


When you’re in the full throttle of a renovation project, there’s often little time to really think about how to repurpose old fixtures like the sink. But once the dust has settled, you can begin to brainstorm how you can reuse them. Whether it’s your laundry room, the bathroom, or even outside, consider all of your options for where that sink might come in handy around your home.


Sell Your Sink to Budget-Friendly Homeowners


Selling your sink is another viable option to consider. Many homeowners these days place any and everything up for sale on online sites such as Craigslist or even in local online groups for their individual neighbourhoods. You can gain a little extra cash while giving some budget-friendly homeowners a great deal.


Donate Your Sink


We all know that owning a home these days often comes with a tighter budget. So why not help out some fellow homeowners who can’t afford to stretch out their budget by donating your old kitchen sink? You can ask around through family and friends first to see if anyone is in need. Failing that, there are plenty of options, such as Habitat for Humanity, Goodwill, or any other suitable charity that you prefer. If you’re unsure which ones will take the sink, you can simply call them up and ask. You’d be surprised just what type of items charities are glad to accept.


Call Up a Scrap Metal Collector to Recycle It


Finally, if you found little success in repurposing, selling or donating, then recycling it is a final option that helps you get it out of the house and keeps it out of a landfill site. There are many eager scrap metal collectors that are more than willing to collect your old steel sink.

So when you’re unsure about what to do with your old kitchen sink after a reno, don’t throw it away for garbage. Consider each of these options that can allow it to be put to good use instead.  Contact us, or give us a call at (613)727-9427

Senior Accessibility: A Guide to the Ontario Renovates Program

Is your home in need of some repairs or modifications for improved accessibility? Well if you’re a senior or a person with disabilities living in Ontario, you could be eligible for funding offered by Ottawa’s Housing Services branch. Here is a guide to the Ontario Renovates Program to help you learn how you could potentially have your home repairs covered.


What is the Ontario Renovates Program?


This program was created under the City Housing Services branch to provide limited funding to low-income seniors and persons with disabilities to assist with home repairs.


What Type of Repairs Does This Include?


The Ontario Renovates Program only provides funding for repairs and modifications that are necessary for improving accessibility for seniors and persons with disabilities who are living within their own home. This aims to provide necessary support to assist with independent living.


What are the Eligibility Requirements?


To be eligible to receive funding through this program, low-income seniors must be 65 years of age or older. It also pertains to persons with disabilities, along with families who have a member of their home who meets the criteria of being 65 or older, and or with a disability of some sort. There is a maximum annual gross annual income which varies depending on the number of residents. For instance a single-person household may have a maximum gross annual income of $36,075, while a two-person household may have a combined gross annual income up to $44,160 to qualify for the program.


What are the Eligibility Requirements of the Property?


To be eligible for the program, your property must be your sole and primary residence located in the City of Ottawa. It must also be valued at or under $376,300 as determined by the province and verified by the owner’s most recent property tax assessment.


What Type of Repairs Can Be Included?


The purpose of this program is to provide funding to assist in making the home a safer place for seniors and persons with disabilities to live independently. Some of the potential repairs that are allowed include:

  • Doors and windows
  • Repairs to foundation, roofs, walls, floors, and ceilings
  • Plumbing, septic, electrical, and heating systems
  • Fire safety features
  • Installing handrails and ramps
  • Chair and bathlifts
  • Height-adjusted countertops

There are many other items that qualify under the program. You can check out more details here.


What About Funding?


Funding is delivered in the form of a forgivable loan. The funding may also be provided in the form of a grant for eligible applicants up to a maximum amount of $18,500. There are certain stipulations when it comes to the details of the scope of funding, which can also be found
here.


How to Apply for the Ontario Renovates Program


To apply for the funding program, head to the City of Ottawa
website to access instructions, details, a checklist and the application form.

The duration of the program runs until March 31st, 2018 or until the funds have been fully spent. So if you think you qualify for the Ontario Renovates Program, be sure to check out their website for all of the details so you can apply before it’s too late. Applications will be accepted until March 31, 2018, or until allocated funds run out.  Contact us, or give us a call at (613)727-9427

Scroll to top